Software in the loop (SITL)
The SITL (software in the loop) simulator helps you to run ArduCopter without any hardware. It is a build of the autopilot code using an ordinary C++ compiler, that gives you a native executable and allows you to test the behaviour of the code without hardware.
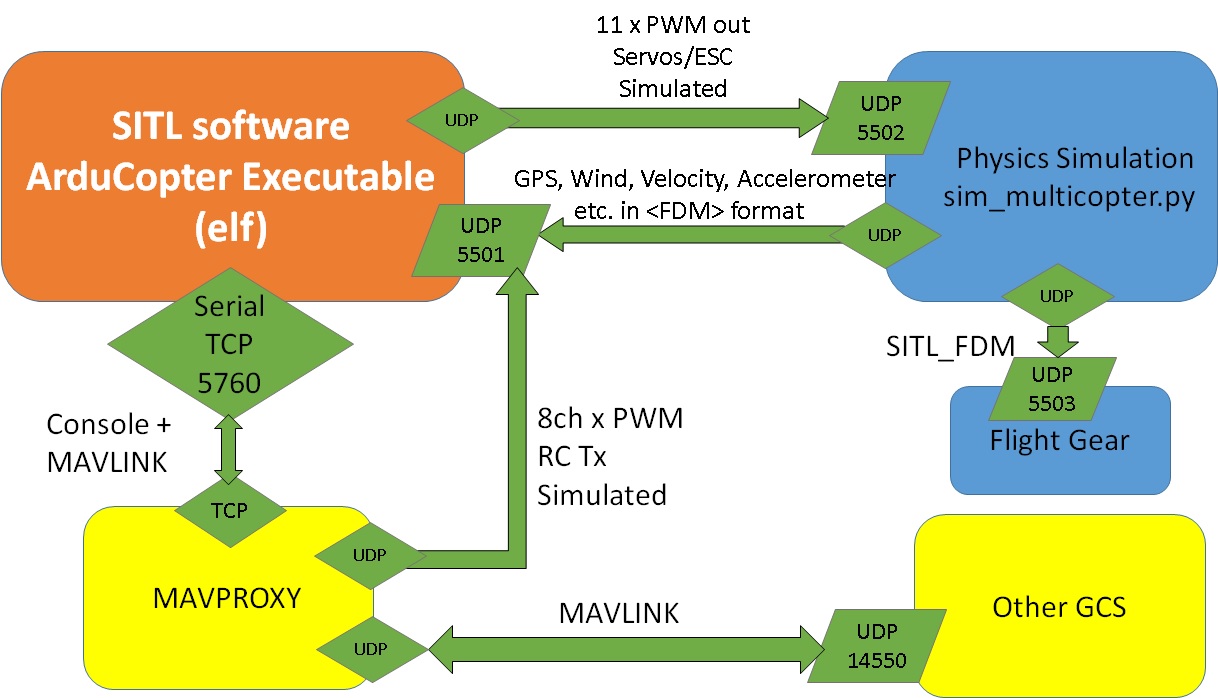
Architecture

Linux Setup
NOTE: Following is tried out on Ubuntu 12.04.1 LTS
$ uname --kernel-name
Linux
$ uname --kernel-release
3.8.0-29-generic
$ uname --machine
x86_64
Step 1: Go to your home directory
cd ~
Step 2: create a new directory for sitl
mkdir ~/sitl
Step 3: Install git
sudo apt-get install git
Step 4: Download ardupilot code
cd ~/sitl
git clone git://github.com/diydrones/ardupilot.git
cd ardupilot
git checkout 8f3071b1b867025af368e2557f7829c6e99a84f1
Step 5: Download MAVProxy, mavlink, APM Planner (Ground Control Station)
cd ~/sitl
git clone git://github.com/tridge/MAVProxy.git
cd MAVProxy
git checkout 69bb758ab85b1937c9677c8fe705dee4a9317bc3
cd ~/sitl
git clone git://github.com/mavlink/mavlink.git
cd mavlink
git checkout d6337dc669c3c4cb9a8d70c20828abb114d7a9f5
cd ~
git clone https://github.com/diydrones/apm_planner
cd apm_planner
git checkout 706638ec4016c58ede9ef504cc10bf71475fc7dd
Step 6: Install some required packages
sudo apt-get install python-matplotlib python-argparse python-serial python-wxgtk2.8 python-scipy python-opencv ccache python-setuptools

sudo apt-get install phonon libqt4-dev libphonon-dev libphonon4 phonon-backend-gstreamer qtcreator libsdl1.2-dev libflite1 flite1-dev build-essential libopenscenegraph-dev openscenegraph libssl-dev

sudo apt-get install libudev-dev libsdl1.2-dev libopenscenegraph-dev
Step 7: Install base packages and required libraries
sudo apt-get install g++ make curl build-essential openocd flex bison autoconf texinfo zip genromfs libftdi-dev libtool zlib1g-dev libncurses5-dev
Step 8: Install GNU awk
sudo apt-get install gawk
Step 9: Install AVR C library
sudo apt-get install avr-libc
Step 10: Install arduino
sudo apt-get install arduino arduino-core
Step 11: Install XML Parser
sudo apt-get install libexpat1-dev
Step 12: Install GPSBabel
sudo apt-get install gpsbabel
Step 13: Install Flight Gear
sudo apt-get install flightgear
Step 14: Adding Flight gear scenary to /usr/share/games/flightgear/Scenery/
Pending
Step 15: Install MAVProxy, pymavlink and APM Planner (Ground Control Station)
cd ~/sitl/mavlink/pymavlink
sudo python setup.py install
cd ~/sitl/MAVProxy
sudo python setup.py install
cd ~/apm_planner/libs/thirdParty/libxbee
sudo make install
cd ~/apm_planner
sed -i '2s/.*/#include <stdint.h>/' ~/apm_planner/src/ui/QGCTCPLinkConfiguration.cc
qmake-qt4 qgroundcontrol.pro
make
Step 16: To build ArduCopter with sitl, do the following:
cd ~/sitl/ardupilot/ArduCopter
sed -i '8s/.*/#define FRAME_CONFIG QUAD_FRAME/' APM_Config.h
make configure
make clean sitl
Step 17: Check if there is an executable called ArduCopter.elf in /tmp/ArduCopter.build
ll /tmp/ArduCopter.build/ArduCopter.elf
Step 18: Copy the executable to ~/sitl
cp /tmp/ArduCopter.build/ArduCopter.elf ~/sitl/
Step 19: Use the following script to start the simulation. You can also save it as startup.sh for future use.
#!/bin/bash
SITL_DIR=$HOME/sitl
GCS_DIR=$HOME/apm_planner
AUTO_TEST_DIR=$SITL_DIR/ardupilot/Tools/autotest
PYSIM_DIR=$AUTO_TEST_DIR/pysim

#Startup script

pkill -f ".*ArduCopter.elf.*"
pkill -f ".*python.*sim_multicopter.py.*"
pkill -f ".*python.*mavproxy.py.*"
pkill -f ".*apmplanner2.*"

gnome-terminal --window --maximize \
--title="AUTOPILOT" -e "$SITL_DIR/ArduCopter.elf" \
--tab --title="PHYSICS_SIMULATION" -e "$PYSIM_DIR/sim_multicopter.py --frame=+ --home=35.7713121,-78.6743912,584,270" \
--tab --title="MAVPROXY" -e "mavproxy.py --master tcp:127.0.0.1:5760 --sitl 127.0.0.1:5501 --out 127.0.0.1:14550 --quadcopter" \
--tab --title="Ground_Control_Station" -x bash -c "cd $GCS_DIR; ./release/apmplanner2"

#NOTE: Home is "NCSU CENTENNIAL LAWN INFRONT OF EB1"
#There should be 4 tabs that are opened and their uses are described as follows:
#AUTOPILOT tab: Simulation of APM 2.6 autopilot, it does the flight
#PHYSICS_SIMULATION tab: It provides the sensor inputs (gps, compass, wind, etc.) to autopilot. Its useful to find if your copter has actually hit the ground or not.
#MAVPROXY: Its a proxy for MAVLINK messages as well as console for command line inputs to the autopilot. Your test app as well as the QGroundControl station communicates to the Autopilot using this app.
#Ground_Control_Station: Its GUI based ground control station that can be used to command and verify missions.
Step 20: In the MAVPROXY tab, load the default config params using the following command
after loading of parameters from AUTOPILOT is complete
param load <HOME_DIR>/sitl/ardupilot/Tools/autotest/ArduCopter.parm
Its generally a one time process, the parameters should be automatically saved after first time use.
References
Attachments (3)
-
startup.sh
(589 bytes) -
added by vananth2 2 years ago.
Startup script for SITL in linux
-
SITL_Architecture.pptx
(42.7 KB) -
added by vananth2 22 months ago.
Addressed UDP binding
-
SITL_Architecture.jpg
(157.2 KB) -
added by vananth2 22 months ago.
Addressed UDP binding
Download all attachments as: .zip